Name of each part
- One touch button.
- Grip
- Stand
- a slide lever
- Wireless charging indicator
Before you start charging wirelessly,
The wireless charging of the smartphone is built into the wireless charger and phone.
The wireless charging coil needs to be exactly matched to reduce heat generation.
It can be charged quickly.
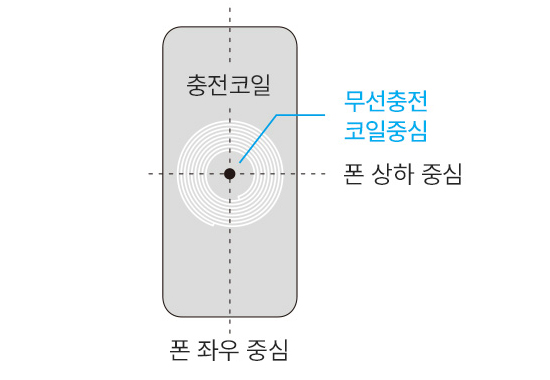
To this end, the wireless charging coil position of the phone to be placed first... Please check it out. Most phones, as shown in the picture, have a phone's It has a built-in wireless charging coil in the center.
Power connection
Connect the charger and cradle with a C-type USB cable.
The charger to be connected must be selected by referring to the following specifications.
- Normal wireless charging: 5V/2.0A or higher
- High speed wireless charging: QC3.0 etc. 9V output or higher
Phone mounting and wireless charging
- Slide lever➃ Press both sides to open the grip.
The horizontal width of the grip is adjusted according to the adjustment of the slide lever, and the width of the grip is also fixed when the slide lever is stopped.
- Adjust the stand according to the height of the phone.
The horizontal width of the grip is adjusted according to the adjustment of the slide lever, and the width of the grip is also fixed when the slide lever is stopped.
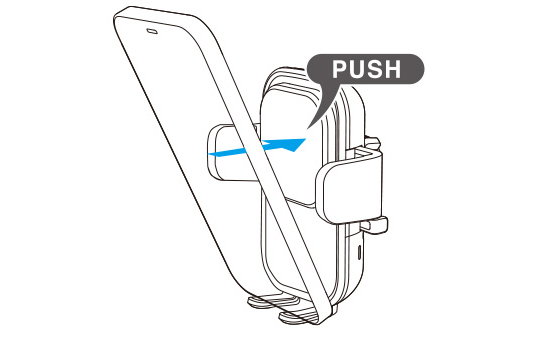
- If you put your smartphone on the stand and push it slightly, the one-touch button➀Press and close the grip and start wireless charging.
- When wireless charging starts, the wireless charging indicator ⑤ changes to blue.
- If the wireless charging pad is not set properly
Move the wireless charging pad lever to readjust it as close to the coil of the phone as possible. - Insufficient capacity of the connected charger
Use a charger of at least 5V / 2.0A. - If the phone case contains metallic materials such as magnets and steel plates
Remove the corresponding metallic substance. - If the cradle is severely heated
Stop wireless charging for a certain period of time to allow the phone and cradle to cool sufficiently. - If you have a phone with no wireless charging function.
Turn off the wireless charging function and use it exclusively for the cradle.
Wireless charging is not done normally in the following cases.
Remove the phone from the cradle
- Slide lever➃ Press both sides to open the grip.
- Open the grip as wide as it is easy to take out the phone and take out the phone.
LED indicator information
The wireless charging indicator operates as follows.
State | an indicator lamp |
---|---|
Power ON. | Turn off after turning on the white LED for 3 seconds |
Charging | Blue LED on |
Charging error | White and blue LED cross-lit |
Charging error (protection circuit operation) item |
---|
Overvoltage and overcurrent / Low voltage and low current / Overheat to stop charging / Metallic material detection / Out of charging position |
precautions
- Wireless charging may be slowed or stopped if the thickness of the smartphone case exceeds about 3mm.
- The temperature at which wireless charging can be performed normally is 0~26 º C. Wireless charging at high temperatures or in direct sunlight, such as dashboards, may trigger the protection circuit and temporarily stop charging, which will cross-light the display lamps white and blue.
-
When wirelessly charging while running an app that uses GPS signals, such as navigation, the app may temporarily stop working in areas where GPS signals are extremely weak.
In this case, press and hold the multi-function button for more than 3 seconds to temporarily disable the wireless charging function. - Depending on the smartphone model, the wireless charging coil may be embedded in an extremely high or low position than the center of the phone. In this case, adjust the height of the stand or use it after receiving it.